We tend to think of "search" as a web-only initiative, but your Mac can do searches, too! Both Spotlight and the Finder are excellent resources, and learning how to use search within these macOS features can help you find what you're looking for much faster.
Here, I'll show you how to search on Mac, how to use Spotlight to search your computer, and some great apps you might prefer to Apple's built-in services.
Search on Mac faster
Search and launch apps with plain English commands. Get Lacona and 240+ more apps with a single Setapp subscription.
Security-testedSpotlight on macOS is a system-wide search tool you can use to find files, photos, emails, documents, your calendar, and the web. Let's take a look at how you can use Spotlight.
The main features of Spotlight search on Mac are:
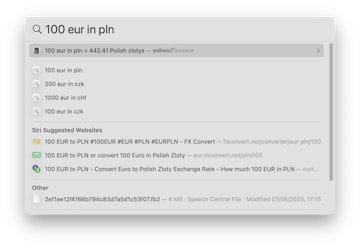
On top of that, Spotlight helps with word definitions, a weather forecast, currency conversion, and a calculator. We'll talk about these options in more detail later.
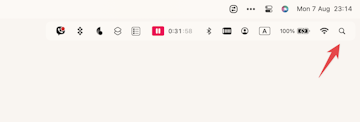
There are at least three ways to activate Spotlight:
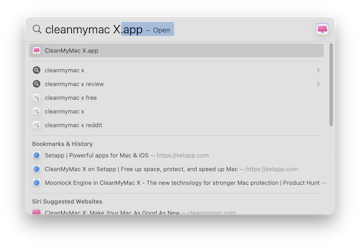
How to Spotlight search for information on Mac?

In the example above, I show you how to search for a document on a Mac. Now, let's look at what you can do with search results:
When you're done with Spotlight, close the tool to return to the regular screen. To do this, click outside the search bar or press the Esc key on the keyboard.
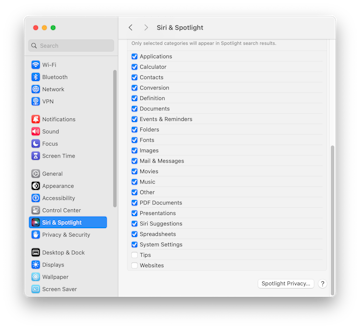
Spotlight settings aren't set in stone, and many of them are easy to change. Here are a few ideas.
Why do that? Mostly for convenience. For example, I know some people are annoyed by the web search results in Spotlight or Macbook Tips when they are just looking for a document.
Go to System Settings > Siri & Spotlight. Scroll down and uncheck the categories you don't want to search in.
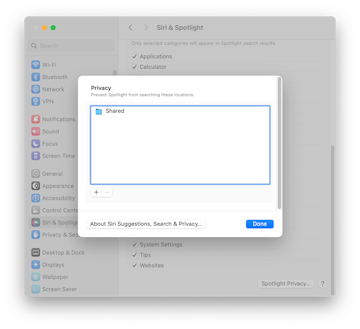
Go to System Settings > Siri & Spotlight > Spotlight Privacy. In the window that appears, press + and select the location you want to hide.
I'd say this is especially important for those who have a shared Mac or keep private files on their laptop that they don't want Spotlight to display. But personally, I simply excluded my company's Google Drive, which stores photos from company events, because they often showed up in the results even when I was searching for other images.
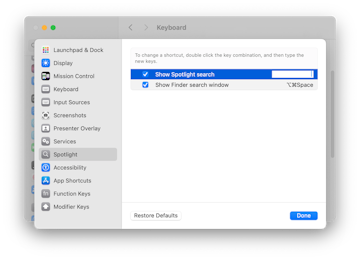
Instead of the default Command + Space , set your own shortcut.
As we discussed above, Spotlight is not only a file search tool. In addition to the features I've mentioned, I want you to know about even more helpful Spotlight functionalities that you can use in your daily life.
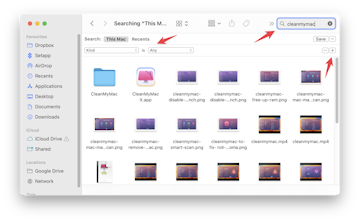
Finder, like Spotlight, is a simple way to find items but is also a bit more direct for discovering files and folders. The tool also lets you organize folders and files according to your preferences. You can open the Finder by clicking on the Finder icon in your Mac's Dock.

Here's how to search with Finder:
If you want to simplify the searching routine for files, launch programs, and adjust settings, try Lacona. This app is like Siri, only for users who don't like talking to their computers by voice. Lacona will understand ordinary human speech if you, as a friend, ask it to find the track of your favorite modern artist, a photo from a team building, or remind you to call your mommy. What's more, Lacona has smart auto-completion and understands you perfectly.
✕
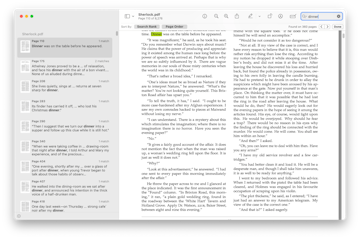
Have you ever thought about a message you sent and wondered "How to search messages on Mac?" It's a fairly common question; we may have shared info about an event with someone or need to bring up details about a conversation. If you're a dedicated iMessages user, you'll want to know how to search the Messages app on your Mac. Here's how to do it:
This will search through your iMessage conversations for the term you enter. Any active conversation with the search term will be highlighted, and you'll be able to click on those conversations to see highlighted text. Keep in mind searching through the Messages app limits your search to iMessage conversations.
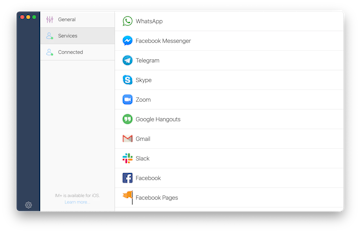
If you have a lot of messengers in your life, I advise you to put them in one place and save your time. Install IM+ and use it as a messenger box – a single app that includes all of your favorite channels of communication.
✕
Searching for words on your Mac is the same process as searching for anything else. You can open Spotlight, search in Finder, or use Lacona to search your Mac.
If you want to know how to find a word on Mac fast, here you go. The most direct shortcut is Command + F, which opens Finder and searches your entire Mac for a word you enter. It's great for those times you know the name of a document but aren't sure where it's located.
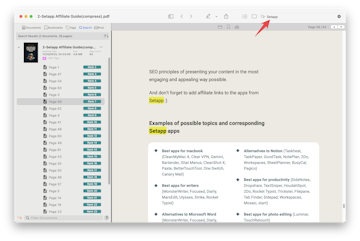
The built-in PDF search does not offer many options. The default method is to search by word. Open the PDF, press Command + F , and type a word to search for.
The program will highlight the found word in the file. But you should understand that this is not a smart search: only exact matches will be displayed, and only if the document has been OCRed (i.e. if the text is text, not an image).
For more advanced options, you'll have to look for third-party tools. One of the popular ones I can recommend is PDF Search. It searches across multiple PDFs, checking for related terms, various combinations of terms, and usually ignoring typos.
Other tools allow you to search a scanned PDF, or chat with the PDF to get a concise, meaningful answer instead of just a highlighted word. Read our article on searching a PDF if this is your topic.
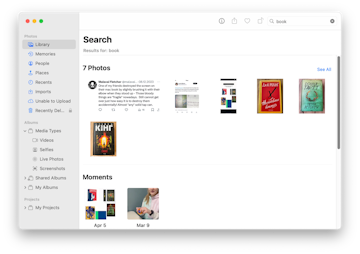
The Mac's photo search is pretty good when it comes to images stored in the Photos app. For example, I typed the word "books" into the search, and the app returned related images. The results included some third-party screenshots and videos, but it's still a good result, considering it's a smart search and the image title doesn't contain the word "book."
Searching for other images and screenshots is more complicated. You can search for them by name in Spotlight, but it's not easy considering the name is typically "Image_23859898q001.heic".
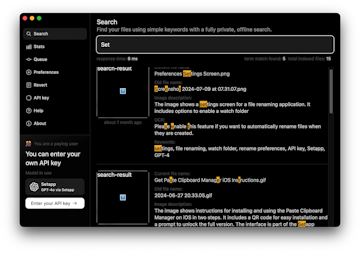
In this case I recommend Keep It Shot. Its job is to give images, screenshots, and videos meaningful names. You just select the files you want to rename and the app does it for you. Instead of "Screenshot 2024-07-11 at 14.59.58.png", you get "Google Doc Interface" – that is, what is actually depicted in the image. This is invaluable for writers, designers, photographers, SEOs – anyone who works with images and screenshots.
And it makes searching a pleasure. Keep It Shot searches by keywords, related words, word fragments, and more – all offline and private. See, there is even an "Image description" line that includes dozens of related words.
Are you looking for a file but without success? Maybe you accidentally deleted it earlier and didn't fix it. Fortunately, even deleted objects can be recovered with DiskDrill, the most powerful data recovery app available for Mac. Here's how to use it:

Like magic, your files will be back on your hard drive and available in search queries.
Finding files on your Mac has never been simpler. Like so many Apple features, Spotlight and Finder search are great but could be a lot better. That's why for advanced search I use additional apps.
These tools and the others I mentioned above (Disk Dril and IM+) are free as part of a seven-day trial of Setapp, a platform with dozens of apps for your Mac, iPhone, and iPad.
When your free trial is over, Setapp is only $9.99 per month for continuous access to its incredible suite of apps.